Wavy Loop Knitting Pattern: Raised Waves for Borders, Stoles & Palazzos
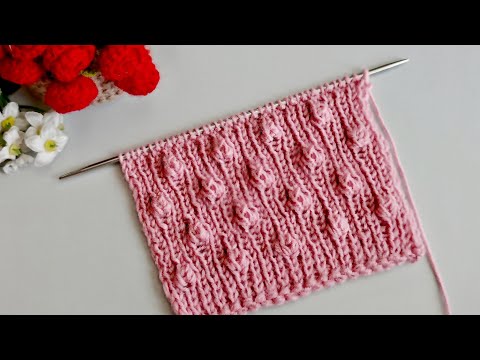
Loops pulled up from three rows below, and purl panels that grow on one side while they shrink on the other. The result is a raised, wavy fabric.
This is another raised design, and it looks lovely on almost any project. Use it for the legs of palazzo pants, for a stole or muffler, or just as a border. The waves come from two things working together. Long loops pulled up from a few rows below cling around little knit columns. And the purl panels between them slowly change width, so the columns lean one way and then the other.
Stitch count
Multiples of 14, plus 5. My swatch is 47 stitches; I teach it on 33.
What you'll need
- Any wool. A smooth wool or merino makes the loops stand out
- Knitting needles. I teach it on bigger needles so you can see clearly, but use the size that suits your yarn
Foundation (4 rows, not repeated)
- Row 1 (RS):right side
Slip 1, purl 2. *Knit 3, purl 7, knit 3, purl 1.* Repeat. With 2 left: purl 1, knit 1.
- Row 2 (WS):wrong side
Purl every stitch.
- Rows 3–4:
Repeat rows 1 and 2.
The two key moves
- Pull a loop: Count down 3 rows below the middle of a 3-stitch knit column and pull a loop through that third space. Stretch it up to the height of your needle, not too tight, and leave it on the right needle. Knit the 3 stitches, then pull a second loop from the same point.
- Close the loops (two rows later): Twist the first loop and knit it together with the first knit stitch through the back loop, knit 1, then knit the second loop together with the third knit stitch through the front loop.
Pattern rows 1–4 (the first wave step)
- Row 1 (RS):right side
Slip 1, purl 2. *Pull a loop, knit 3, pull a loop, purl 7, pull a loop, knit 3, pull a loop, purl 1.* Repeat. Purl 1, knit 1.
- Row 2 (WS):wrong side
Purl all the stitches, but slip every loop without knitting it.
- Row 3 (RS):right side
Slip 1, purl 2. *Make 1 purlwise (lift the strand and purl it, so no hole forms), close the loops over the knit column, purl 2 together, purl 3, purl 2 together, close the loops, make 1 purlwise, purl 1.* Repeat. Purl 1, knit 1.
- Row 4 (WS):wrong side
Purl every stitch.
In row 3 the 7-stitch purl panel became 5, and the single purl stitch became 3. That's the whole idea: one purl panel shrinks by 2 while its neighbour grows by 2.
Pattern rows 5–16
Keep repeating that 4-row rhythm: pull loops, purl back slipping the loops, close the loops while shifting the purls, then purl a row. Every right-side row starts with slip 1, purl 2 and ends with purl 1, knit 1, and the part between the stars is repeated across.
- Row 5 (RS):right side
Slip 1, purl 2. *Purl 1, pull a loop, knit 3, pull a loop, purl 5, pull a loop, knit 3, pull a loop, purl 2.* Repeat. Purl 1, knit 1.
- Row 6 (WS):wrong side
Purl every stitch, slipping every loop.
- Row 7 (RS):right side
Slip 1, purl 2. *Purl 1, make 1 purlwise, close the loops, purl 2 together, purl 1, purl 2 together, close the loops, make 1 purlwise, purl 2.* Repeat. Purl 1, knit 1.
- Row 8 (WS):wrong side
Purl every stitch.
- Row 9 (RS):right side
Slip 1, purl 2. *Purl 2, pull a loop, knit 3, pull a loop, purl 3, pull a loop, knit 3, pull a loop, purl 3.* Repeat. Purl 1, knit 1.
- Row 10 (WS):wrong side
Purl every stitch, slipping every loop.
- Row 11 (RS):right side
Slip 1, purl 2. *Purl 2, make 1 purlwise, close the loops, purl 3 together, close the loops, make 1 purlwise, purl 3.* Repeat. Purl 1, knit 1.
- Row 12 (WS):wrong side
Purl every stitch. The panel that started with 7 purls is down to 1, and the single purl has grown to 7.
- Row 13 (RS):right side
Slip 1, purl 2. *Purl 3, pull a loop, knit 3, pull a loop, purl 1, pull a loop, knit 3, pull a loop, purl 4.* Repeat. Purl 1, knit 1.
- Row 14 (WS):wrong side
Purl every stitch, slipping every loop.
- Row 15 (RS):right side
Slip 1, purl 2. *Purl 1, purl 2 together, close the loops, make 1 purlwise, purl 1, make 1 purlwise, close the loops, purl 2 together, purl 2.* Repeat. Purl 1, knit 1. Now it works the other way: the middle panel grows and the outer ones shrink.
- Row 16 (WS):wrong side
Purl every stitch.
Rows 17–24
In the video I knit up to row 16 and then explain the last 8 rows rather than knit them all on camera, so the video doesn't get too long. They carry on in the same order:
- Rows 17–18: Work as rows 9–10. The stitches are back in the same places.
- Rows 19–20: Close the loops as in row 15, but the middle panel now grows from 3 purls to 5, and the outer panels shrink from 5 to 3. Purl row 20.
- Rows 21–22: Work as rows 5–6.
- Rows 23–24: Close the loops again, growing the middle panel from 5 to 7 and shrinking the outer panels from 3 to 1 (purl those 3 together, as in row 11). Purl row 24.
After 24 rows you're back to where you started, with 7 purls and 1 purl. Start again from pattern row 1.
This one takes a little concentration the first time through. If any step isn't clear, tell me in the comments on the video and I'll make a full step-by-step video of the last rows too.
- wavy knitting pattern
- loop stitch
- raised knitting
- textured knitting
- stole pattern
- border knitting
- hand knitting
- wool