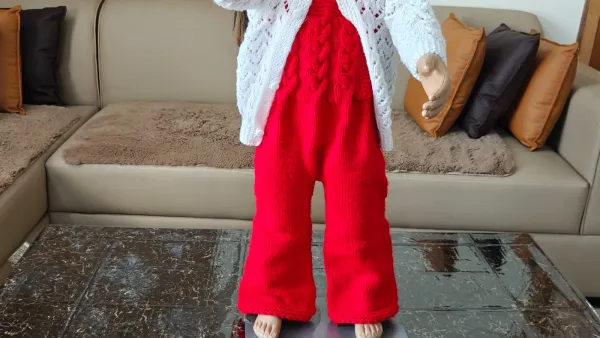
Knit a Bell-Bottom Baby Dungaree for a 2–3 Year Old Girl
A bell-bottom dungaree knitted in the round from the ankles up, so there's almost nothing to sew. Garter hems, a braided cable bib, and straps you can make as long as you like.
This dungaree is for a 2–3 year old girl, in a little bell-bottom style. From the shoulder to the foot it measures 30 inches. I knit it on a circular needle so it comes out seamless: each leg is knitted in the round, the two legs join into one tube for the body, and only the bib and straps are worked flat.
To make it bigger or smaller, keep the same stitch counts and change the length. Take a few rows off the body and a few off the legs, in proportion, until it matches your child.
What you'll need
- A slightly thick wool. I used Ganga "Pound of Happiness"
- Size 7 circular needle (or two straight needles if you don't have one; you'll just need to sew the seams)
- Stitch markers, or a bit of contrast yarn to use as a marker
- A cable needle, a sewing needle, and buttons for the front
Step 1: Cast on and garter hem (each leg)
Cast on 60 stitches (30 pairs). I used the Old Norwegian cast on, but use whichever you like. Since there's no seam to sew, you don't need to leave a long tail.
- Split the stitches 15 pairs and 15 pairs, and join into a round. Make sure the stitches aren't twisted.
- To stop a gap forming at the join, cross the first two stitches: slip them off, bring the working yarn between them, and put them back before you start knitting.
- Place a marker at the start of the round.
- Work garter stitch in the round: one round knit, one round purl. Work 6 rounds in total to get 3 garter ridges.
Step 2: The leg
- Stockinette
Knit every round for 50–52 rounds, until the leg measures 8 inches including the border (about 7 inches above the garter).
- Shaping (round 51)
With a marker after 30 stitches, slip-slip-knit through the back loop, knit 26, knit 2 together. Repeat on the other 30 stitches. You now have 56 stitches.
- Straight
Knit 14 rounds.
- Thigh increases
On each half, knit into the front and back of the first stitch, knit to the last stitch, and knit into it twice. You're back to 60 stitches.
- Straight
Knit 10 more rounds. The leg should now be about 12 inches including the border.
- Crotch
Cast on 1 stitch, knit the whole round, then cast on 1 more stitch at the end. You now have 62 stitches.
Pull the first cast-on stitch snug, or you'll get a little hole at the crotch. Keep the yarn tail from each leg; you'll use it later to close any gap.
Because everyone's tension is different, go by the inches rather than the round count. Your 50 rounds might come out slightly longer or shorter than mine.
Now knit the second leg exactly the same way.
Step 3: Join the legs and knit the body
- Put both legs on one circular needle: 124 stitches.
- Knit around the first leg to the join. Pick up one stitch from each side of the gap and knit them together. Do the same at the second join. You now have 126 stitches.
- Knit in the round in stockinette. I knitted 44 rounds, until the whole dungaree measured 20 inches from the foot.
Step 4: Set up the bib and side panels
Divide the 126 stitches into 63 for the front and 63 for the back. At each side, mark 5 stitches on the back and 5 on the front (10 side stitches). These, plus 5 more stitches on either side of them, become garter panels, and the 10 in the middle will be bound off for the armholes.
- Set-up round
Knit to 5 stitches before the marked side stitches, purl 20 (5 + 10 + 5), knit to 5 stitches before the next side, purl 20, knit to the end.
- Cable layout
The 43 stitches between the garter panels become: purl 4, (knit 9, purl 4) three times. That's 3 cables of 9 stitches with 4-stitch purl gaps.
- Following rounds
Work the cable stitches as they appear (knit 9, purl 4). The 20 garter stitches alternate: one round knit, one round purl.
Pulling in the width with cables means you don't have to decrease one stitch at a time along the sides. The cables shrink the fabric and shape the bib by themselves.
Step 5: Bind off for the armholes
After 5 pattern rounds (6 garter rounds), on the next round work to the garter panel, knit 5, bind off the middle 10 stitches, then knit the remaining 4 (5 on the needle). Do the same at the other side. The front and back are now separate, each with a 5-stitch garter edge on both sides.
Step 6: The back bib with braided cables
Now knit flat, back and forth. The first stitch of every row is the edge stitch, then 4 garter stitches, then the cable pattern.
- Cross row (right twist)
Hold the first 3 cable stitches behind on a cable needle, knit the next 3, then knit the 3 held stitches. Knit the last 3 of the 9 plain. Purl 4. Repeat for all 3 cables.
- Next 3 rows
Work the stitches as they appear (on the wrong side, knit the purls and purl the knits), keeping the garter edges.
- Cross row (left twist)
Knit the first 3 cable stitches plain, then hold the next 3 in front, knit 3, and knit the held 3.
- Next 3 rows
Work as the stitches appear.
Alternate right and left twists every fourth row and the cables form a braid. I knitted 34 rows (17 garter ridges on the edges) above the armhole bind off.
Step 7: Top border and straps
- On the next right-side row, purl 2 then purl 2 together in each 4-stitch gap, so the cables can't spread open above the border. Cross the cables one last time.
- On the wrong side, decrease a little more by working 2 stitches together where the gaps were, and purl across.
- Now purl every row, from both sides, for 7 rows of garter stitch. Finish on a right-side row.
- From the wrong side, bind off firmly, not loose, until 8 stitches are left.
- Strap: On those 8 stitches, purl every row from both sides until the strap is as long as you want. I made mine long so it can be adjusted. Bind off.
- Pick up 8 stitches at the other end of the back and knit the second strap.
Step 8: The front and finishing
Knit the front bib just like the back, with the same cables (or any cable you like on the same stitches) and the same garter border, then bind off all the stitches. The front doesn't need straps. If you're using big buttons, make buttonholes in the border. Small buttons go through the garter fabric without any buttonholes.
Sew the buttons onto the front, button the straps on, and your hand-knitted bell-bottom dungaree is ready. I made a matching red and white cardigan to go with it. That tutorial is on the channel too.
- baby dungaree
- knitted dungaree
- kids knitting pattern
- circular needles
- cable knitting
- hand knitted baby clothes
- wool
- handmade