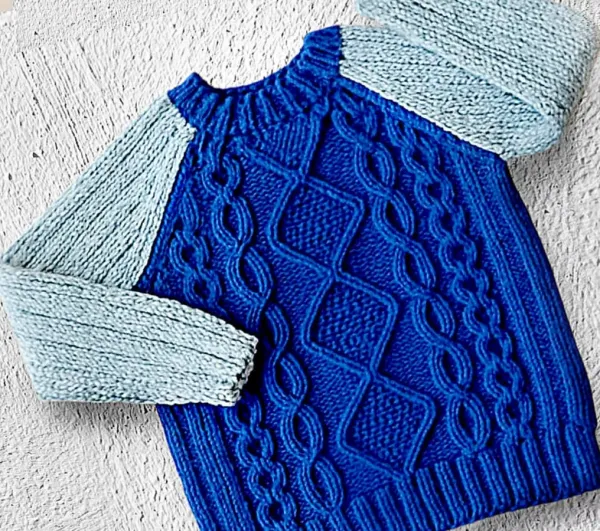
Knit a Ready-Made Style Cable Raglan Sweater for a 9–10 Year Old Boy
A ready-made style pullover for a 9–10 year old: an eye-catching cable panel on the front, a stretchy rib texture elsewhere, raglan sleeves, and a neat buttoned neckband.
This full video continues an older video where I taught the cable pattern. Here we use it on a ready-made style sweater for a 9–10 year old boy. It's a raglan pullover with a round neck and a small buttoned opening at the side of the neck.
What you'll need
- Thick wool. Mine is Red Heart, imported from America, but Ganga Pound of Happiness, Olivia or Desire come in the same thickness and colours
- Size 6 needles, plus size 8 for the neckband
- A cable needle and one small button
Step 1: The front
- Border
Cast on 70 stitches and work 10 rows of 2x2 rib.
- Increase
Straight after the border, increase 12 stitches evenly (82).
- Cable panel (64 stitches, the same for every size)
2 purl, 8-stitch cable, 2 purl, 8-stitch cable, 2 purl, a 20-stitch centre panel, 2 purl, 8-stitch cable, 2 purl, 8-stitch cable, 2 purl.
- Sides
The stitches on either side of the panel are worked in a knit 3, purl 1 rib.
The 8-stitch cables cross every 8 rows. The big centre panel (seed stitch framed by twisted stitches that travel out and back) runs over 16 rows. So two small-cable segments match one centre segment, and they always finish together, which makes it easy even for beginners.
Work 9 blocks (72 rows). Mine measured 13 inches long and 14 inches wide, and it's very stretchy, so the child can wear it for a long time.
Step 2: Front raglan
- On every right-side row: Slip 1, slip-slip-knit, work in pattern to the last 3 stitches, knit 2 together, knit 1. The centre panel keeps going as normal, with its travelling stitch twisted on every right-side row.
- Wrong-side rows: Work the stitches as they appear, except the seed stitches in the centre, which you work opposite to how they look.
- Decrease 21 times like this (42 rows). On the 22nd and last decrease row, also decrease 3 stitches across the centre panel. You're left with 35 stitches.
Step 3: The back and sleeves
The cables would feel bulky against the back, so the back and sleeves are knitted in the knit 3, purl 1 rib throughout. It's stretchy and comfortable.
- Back: Cast on 79 (3 fewer than the front, as there are no cables pulling it in) and knit the same border. Work 72 rows, then decrease 1 at each side on every right-side row 22 times, leaving 35 stitches.
- Sleeves: Cast on 30, knit the border, and increase to 35. Then increase 1 at each end every 7th row until the sleeve is 13 inches long. Decrease 22 times at each side, as for the back, leaving 30 stitches.
Step 4: The neckband
- Cast on 5 extra stitches at the start for the button overlap, and change to size 8 needles to snug the neck.
- Work 2x2 rib across the front, knitting 2 together here and there to reduce the stitches, because thick wool makes a loose neck.
- Join the first sleeve by working its first stitch together with the last front stitch. Knit the sleeve stitches plain, not rib, so the colour change doesn't show a line, decreasing as you go (knit 3, knit 2 together).
- Join the back the same way, in rib with a few decreases, then the second sleeve.
- Work the neckband in 2x2 rib, making one small buttonhole in the overlap.
- Bind off with a tubular (sewn) bind off for a ready-made edge. I have a separate tutorial for it.
Step 5: Sewing up
Match the corners where the raglan decreases start, pin them, and sew the raglan seams below the neckband with invisible stitching. Pick up a loop from each side, go back in where the yarn came out, and pull. Then sew the side seams and sleeve seams in the matching colour, and sew on the button.
- cable sweater
- boys sweater pattern
- raglan sweater
- cable knitting
- kids knitting pattern
- thick wool
- hand knitted
- tubular bind off