Knit a Ready-Made Style Men's Pocket Cardigan with Shawl Collar
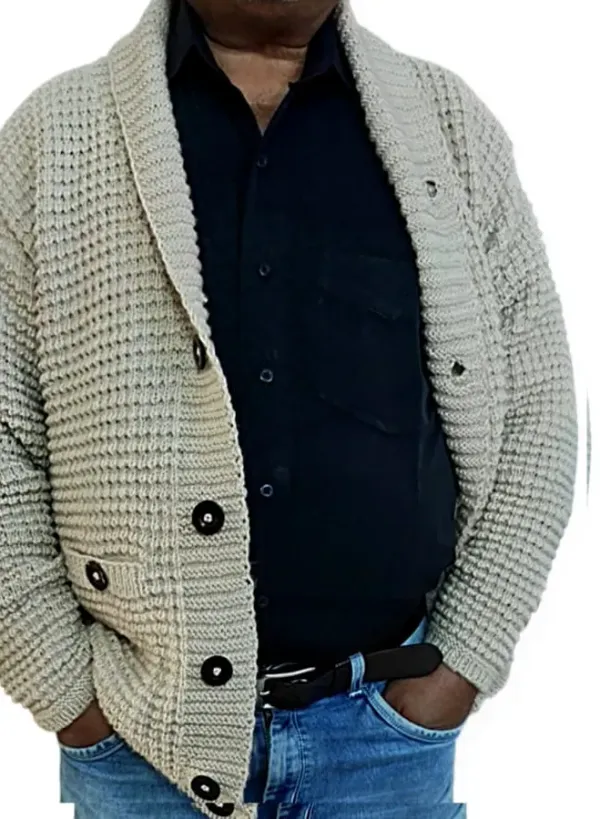
A gents' cardigan that looks shop-bought: textured stripes, two inset pockets, big buttons, and a button band that widens into a shawl collar.
This is a gents' cardigan (koti) with the look of ready-made knitwear: a textured stripe all over, two inset pockets with ribbed welts, a wide striped button band that grows into a shawl collar, and big buttons. It's a long project, so here's the full construction with my counts. My wool is thick, so treat the numbers as a guide and check your inches.
The patterns
- Body stitch, row 1 (RS)
Knit.
- Body stitch, row 2 (WS)
Purl.
- Body stitch, row 3 (RS)
Knit.
- Body stitch, row 4 (WS)
Slip 1. *Knit 1 into the stitch below, purl 1.* Repeat. Every 4 rows makes one raised stripe, or block.
- Button band (13 stitches)
Alternate 2 rows of reverse stockinette with 2 rows of stockinette, so the band has horizontal stripes of its own.
All the borders start with a tubular cast on (I have a separate tutorial for it). Every piece uses the same border.
Step 1: The fronts (make two)
- Cast on 68 stitches and knit the border.
- Right front: The 13 band stitches sit at the start of the right-side rows. Slip 1, then purl 12 on the reverse-stockinette band rows. Work the other 55 stitches in the body stitch.
- Left front: Work it as a mirror image, with the band at the end of the right-side rows. The buttonholes go on this side.
- Buttonholes (for big buttons): On the band, knit 5, bind off 4 (bind off more for bigger buttons), and work to the end. On the next row, cast those 4 stitches on again, firmly. I spaced the buttonholes 10 stripes apart.
Step 2: Inset pockets
After 68 rows, divide each front into 24 side stitches, 25 pocket stitches, 6 stitches and the 13 band stitches. Use an odd number for the pocket so it starts and ends with a knit stitch.
- Welt: Work the 25 pocket stitches in 1x1 rib for 8 rows while the rest of the front stays in pattern. Then bind them off in rib.
- Lining: Turn the front to the inside and find the row where the welt began (count 3 rows up from one side, 4 from the other). Mark its first and 25th stitch. With a new strand (the centre end of your ball, or a second ball), pick up the 25 stitches purlwise, one at a time, from the upper bar of each stitch. Always use the upper bar, or your count will change. Pick up one extra at each side too, 27 in all, so the pocket isn't tight. Leave a long tail for sewing the lining sides later.
- Knit the lining: Knit the first row, then carry on in stockinette (knit one row, purl the next). Stockinette grows faster than the textured stripe, so I knitted 60 rows where the front had 64 up to this point. Make both linings the same way.
- Rejoin: The welt was bound off, so the lining now takes the place of the 25 pocket stitches. On the next front row, work in pattern to the last stitch before the pocket and work it together with the first extra lining stitch, like a three-needle join. Work the 25 lining stitches in pattern as if they were the front. Then work the other extra lining stitch together with the next front stitch. On the left front, knit that join through the back loop so it doesn't show on the right side. Cut the lining yarn and carry on in pattern across the whole front.
Step 3: Collar shaping and armholes on the fronts
- Knit the fronts to 120 rows after the border (30 stripes).
- Collar: The band now starts to widen into the shawl collar. Absorb one body stitch into the band (13 → 14 stitches), then do it again every 3 stripes (12 rows): 15, then 16.
- Armholes: At row 145 (36 stripes), bind off 4, then 3, 2 and 1 at the armhole edge on the following rows. From here, add a stitch to the band after every stripe.
- Knit 70 rows after the armhole (about 17½ stripes). I ended with about 33 collar stitches and 25 shoulder stitches on each front. A couple either way is normal.
Step 4: The back
- Cast on 110, knit the border, and increase 1 at each end (112).
- Work the body stitch for 140 rows. Mine measured 20 inches wide and 15½ inches long including the border. It's a loose fit, so it doesn't need to be longer.
- Armholes: Bind off 4, 2, 1 and 1 at each side, then knit straight for 64 rows (16 stripes, about 8 inches), 6 rows fewer than the fronts.
- Back neck: Keep 25 stitches for each shoulder. Bind off the centre 25, then 6 and 3 on each side on the following rows. Bind these off firmly, because the back neck is already broad. Where the first bind-off leaves a gap, pick up a loop and work it together with the next stitch.
Step 5: Shoulders and the shawl collar
- Join each front to the back at the shoulder with a three-needle bind off over the 25 shoulder stitches, right sides facing each other.
- Collar: Carry on knitting the collar band stitches across the back neck. At the end of each row, pick up one stitch from the back neck edge and work it together with the last band stitch. Pick up closely at first, space the pick-ups out in the middle so the collar doesn't bunch, then pick up closely again. I got 17 stripes across.
- Join: Graft the two halves of the collar together at the centre back with a sewing needle, using a tail four times the width. That way the join is invisible.
Step 6: Sleeves (make two)
- Cast on 51 and knit the same border.
- In pattern, increase 1 stitch at each end every 9th row. I knitted 84 rows and had 87 stitches. The sleeve measured 18½ inches.
- Sleeve cap: Bind off 4, 2 and 1 at each side, then 2 stitches at each side five times. Then bind off the remaining 51. For a rounder cap, decrease by 2 twice more.
Step 7: Finishing
Sew in the sleeves, sew the side and sleeve seams, and stitch the pocket linings down on the inside. Sew on the buttons, including a decorative button on each pocket welt, and your ready-made style cardigan is finished.
- mens cardigan
- gents cardigan knitting
- shawl collar
- knitted pockets
- cardigan pattern
- hand knitting
- thick wool
- handmade